NUMARK MIXTRACK 3
SETUP
Numark Mixtrack 3 is a USB class compliant device and does not require any special drivers to be installed on your system in order to work.
VirtualDJ 8 Setup
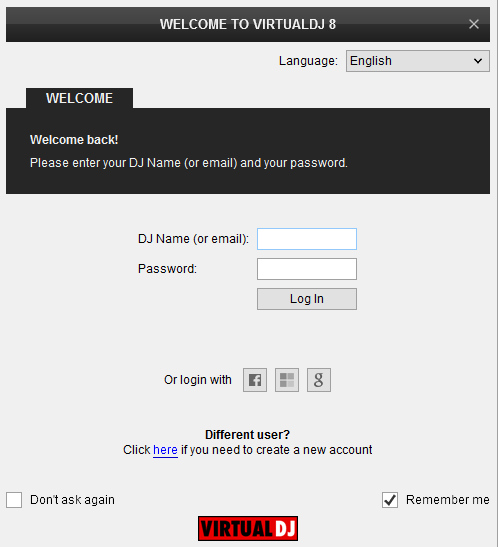
Once VirtualDJ 8 is launched, a Login Window will appear. Login with your virtualdj.com account credentials.
A Pro Infinity, a Plus Controller or a Pro Subscription License is required to fully use the Numark Mixtrack 3. Without any of the above Licenses, the controller will operate for 10 minutes each time you restart VirtualDJ.
http://www.virtualdj.com/buy/index.html
The Numark Mixtrack 3 is also operating with the bundled VirtualDJ Limited Edition.
Read further about the procedure required for VirtualDJ 8 LE at the Limited Edition Chapter
Without any of the above Licenses, the controller will operate for 10 minutes each time you restart VirtualDJ.
http://www.virtualdj.com/buy/index.html
Click to OK.
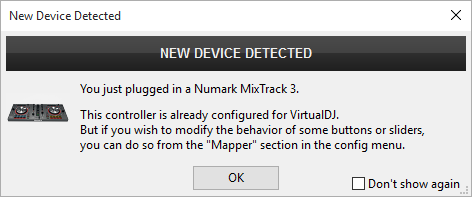
The unit is now ready to operate.
Advanced Setup
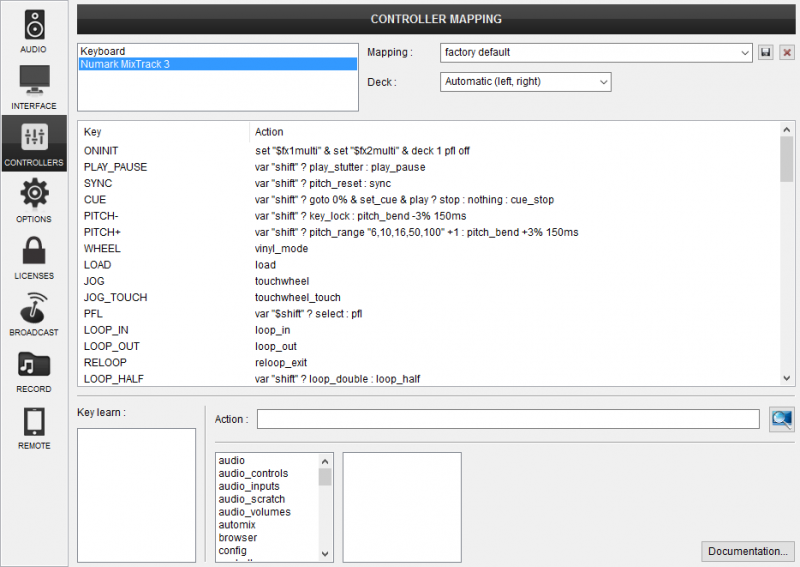
The unit should be visible in the CONTROLLERS tab of Config and the “factory default” available/selected from the Mappings drop-down list. The factory default Mapping offers the functions described in this Manual, however those can be adjusted to your needs via VDJ Script actions.
Find more details at
http://www.virtualdj.com/wiki/VDJscript.html
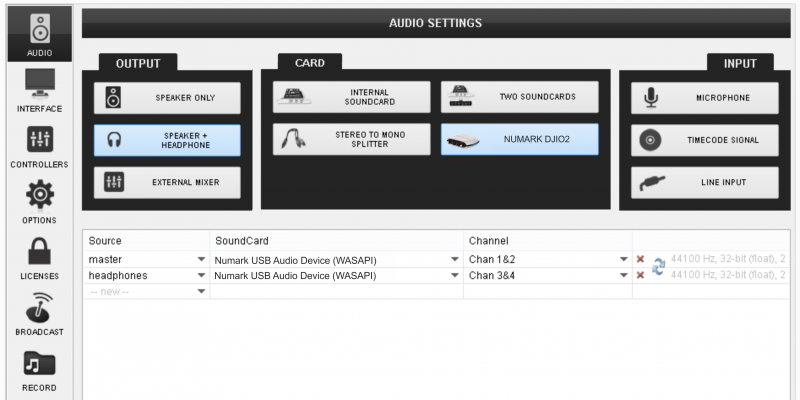
This unit does not have a built in sound interface and therefore you need to use a separate soundcard (such as Numark DJiO2) as per the screenshot below. Please note that if you are using a PLUS Controller or a LE License then only a “Master + Headphones” audio setup is valid regardless of the capabilities of your soundcard..
For further software settings please refer to the User Guides of VirtualDJ 8.
http://www.virtualdj.com/wiki/PDFManuals.html
LAYOUT
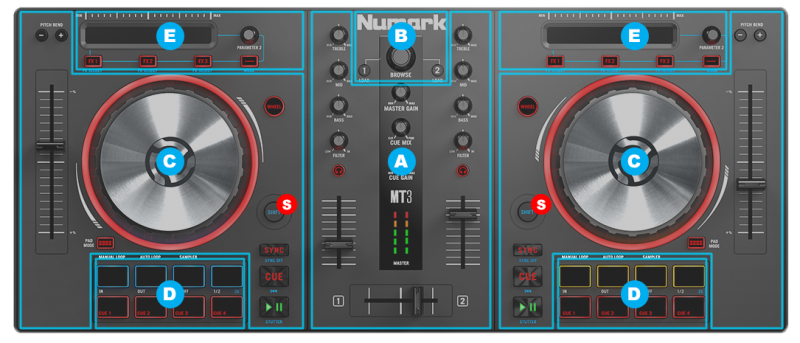
S. SHIFT. Hold this button down to access secondary functions of the Numark Mixtrack 3 (mainly in blue lettering)
The functionality of each button, knob and slider per section (as shown in the image above) will be explained in detail in the next chapters
Mixer
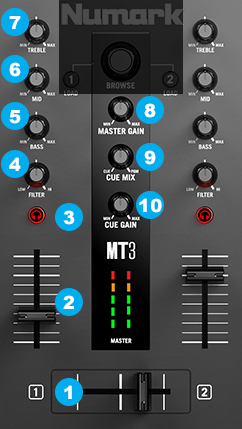
- Crossfader: Controls the blend between the two decks.
- Volume: Adjusts the volume of the individual channels in the software.
- PFL: Sends pre-fader audio to the Cue Channel for headphone monitoring.
- Filter: Adjusts the amount of the filter effect. Turning the knob left will produce a Low Pass Filter and right will produce a High Pass Filter.
- EQ Low: Controls the bass frequencies for the individual channels.
- EQ Mid: Controls the mid range frequencies for the individual channels.
- EQ High: Controls the treble frequencies for the individual channels.
- Master Volume: Adjusts the master volume in the software.
- Headphones Mix: Adjusts the software’s audio output to the headphones, mixing between the cue output and the master mix output.
- Headphones Volume: Adjusts the volume for headphone cueing in the software.
Browser Controls
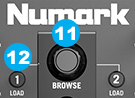
- Browser knob: Rotate this knob to browse through folders and tracks. Press the Knob to cycle between Folders and Tracks panel.
- Load: Press one of these buttons while a track is selected to load it on the corresponding deck.
Deck Controls
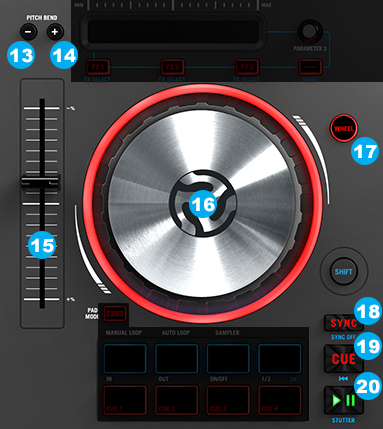
- Pitch bend down: Press and hold to momentarily reduce the speed of the track.
- Pitch bend up: Press and hold to momentarily increase the speed of the track.
- Pitch: Control the speed of the music. Move towards the "+" to speed the music up, or move towards the "–" to slow it down.
- Jog wheel: Controls the audio when the wheel is touched and moved. When the Wheel (Vinyl) button (17) is not active, use the jog wheel to bend the pitch of the track. When the Wheel button is active, use the jog wheel to grab and move the audio, "scratching" the track as you would with a vinyl record. You can also grab the non-touch-sensitive outer wheel to bend the pitch of the track.
- Wheel (Vinyl) Mode: Activates “Vinyl Mode” so that you can use the platter/jog wheel to grab and move the audio, "scratching" the track as you would with a real vinyl record.
- Sync: Press this button to automatically adjust pitch and synchronize the BPM of the two decks. Hold SHIFT + Sync to gradually reset the pitch to zero and restore the original BPM of the track.
- Cue: Sets and recalls the main Cue point in the current track. Hold down the Cue button for temporary play of the cue point. The track will play for as long as the button is held down and return to the cue point once it is released. Hold SHIFT + Cue to return the play head to the start of the track.
- Play/Pause: Starts and suspends playback. Hold SHIFT + Play/Pause to stutter the track from the last set cue point. If a cue point has not been set, the play head will return to the start of the track
Performance Pads
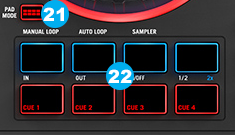
- Pad Mode: Use this button to change the operation of the upper 4 pads, between one of the 3 modes : Manual Loop, Auto Loop & Sampler:
To enter Manual Loop mode, hold this button and press the 1st pad.
To enter Auto Loop mode hold this button and press the 2nd pad.
To enter Sampler mode hold this button and press the 3rd pad. - Performance Pads: The upper row of pads has different functions depending on their mode: Manual Loop mode, Auto Loop mode, and Sampler mode.
To select a mode, hold down the Pad Mode button (21) and press one of the upper pads. A LED under the pad section indicates the currently selected mode while the Pad Mode button is held down.
- Loop In – Sets the beginning of a loop. After a Loop Out point is set, when this button is pressed again, it will allow for fine adjustment of the Loop In point.
- Loop Out – Sets the end point for the loop. When this button has been pressed after a Loop Out point has been set, it will allow for fine adjustment of the Loop Out point.
- On/Off – When this is pressed inside a loop, this will turn the loop off. When pressed outside a loop, this will activate the loop and start playback from its Loop In point. If a loop has not been set, this button will have no effect.
- Loop x1/2 – Cuts the currently playing loop in half. Press Shift + Loop x1/2 to double the length the currently playing loop.
Manual Loop Mode:[list]
Auto Loop Mode:
- Auto 1 – Sets and starts playback of a 1-beat autoloop
- Auto 2 – Sets and starts playback of a 2-beat autoloop
- Auto 4 – Sets and starts playback of a 4-beat autoloop
- Auto 8 – Sets and starts playback of an 8-beat autoloop.
Sampler Mode:
- Sample 1 – Plays the sample assigned to Sample Pad 1.
- Sample 2 – Plays the sample assigned to Sample Pad 2.
- Sample 3 – Plays the sample assigned to Sample Pad 3.
- Sample 4 – Plays the sample assigned to Sample Pad 4.
The bottom row of pads is used to trigger Cue points. If a Cue point has not already been set for the loaded track, this control will mark the Cue point. If a Cue point has already been set, this control will jump to Cue point.
[/list]
Effects
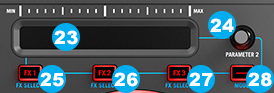
- Touch Strip: Use the Touch Strip to adjust the first parameter of the assigned FX (if applicable). Hold SHIFT + Strip Search to search through a track’s time.
- Parameter 2: Use to adjust second parameter of the assigned FX (if applicable)
- FX 1 On/Off: Turns FX on effect slot 1 on and off. Hold SHIFT + FX1 to select the next FX from the list of available effects.
- FX 2 On/Off: Turns FX on effect slot 2 on and off. Hold SHIFT + FX2 to select the next FX from the list of available effects.
- FX 3 On/Off: Turns FX on effect slot 3 on and off. Hold SHIFT + FX3 to select the next FX from the list of available effects.
- Mode: Press and release this button to enable instant FX activation when touching the touch strip (23).
Limited Edition
Numark Mixtrack 3 is bundled with VirtualDJ LE (Limited Edition). The Limited Edition has no time limit, and Mixtrack 3 will fully control VirtualDJ.
However some features will not be available. See details here http://www.virtualdj.com/wiki/What%20is%20the%20difference%20between%20VirtualDJ%20LE%20and%20other%20VirtualDJ%20Licenses.html
If you don’t own a Pro Infinity, a Plus or a Pro Subscription license, use the following link to download and install VirtualDJ 8 LE, by entering the VirtualDJ LE Keycode that came with your unit.
VirtualDJ 8 LE download link: http://virtualdj.com/le
Follow setup instructions as provided here.. http://www.virtualdj.com/wiki/VirtualDJ%20LE%20Install%20Guide.html
